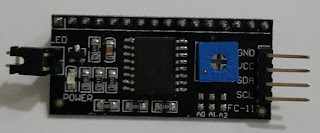
The 16x2 LCD display conrol have been made with serial i2C module (Figure - 1) in this lesson. I' ve measured humudity and teparature with DHT 11 module and I've displayed the values on the LCD display.
The using LCD displays (Figure 2) with your Arduino is popular, however the amount of wiring requires time and patience to wire it up correctly and also uses a lot of digital output pins. That’s why we love these serial backpack modules they’re fitted to the back of your LCD module and allows connection to your Arduino with only four wires power, GND, data and clock. So with this I2C interface LCD module, you will be able to realize data display via only 2 wires. If you already has I2C devices in your project, this LCD module actually cost no more resources at all. It is fantastic for Arduino based project.
Figure 2 - 16x2 LCD Display Module
DHT 11 Module
Figure 3 - DHT 11 Temperature and Humidty Module
1 - the VDD power supply 3.5~5.5V DC
2 - DATA serial data, a single bus
3 - NC, empty pin
4 - GND ground, the negative power
The Connection of LCD Display and I2C Module
The Connection of LCD Display and I2C Module is made (Figure 4).
Figure 4 - The Connection of LCD Display and I2C Module
Firstly I've conected the i2c module to LCD Display (Figure 5). Then I've set the mesurment circuit (Figure 6).
Figure 5 - The LCD display and I2C Module
Figure 6 - The Measurment of The Temperature and Humidty Circuit
#include <Wire.h>
#include <LiquidCrystal_I2C.h>
#include <DHT11.h>
#include <Math.h>
int pin=8;
DHT11 dht11(pin);
// The initialization LCD Display
#include <DHT11.h>
#include <Math.h>
int pin=8;
DHT11 dht11(pin);
// The initialization LCD Display
LiquidCrystal_I2C lcd(0x27,2,1,0,4,5,6,7,3, POSITIVE);
void setup()
{
lcd.begin (16,2);
}
void setup()
{
lcd.begin (16,2);
}
void loop()
{
float nem,sicaklik;
int oku = dht11.read(nem,sicaklik); //(Reading the temperature and humidty)
lcd.setBacklight(HIGH);
// Displaying the Temperature
lcd.setCursor(0,0); // First character - First Line
lcd.print("Temp :");
lcd.setCursor(6,0);
lcd.print(sicaklik, 2);
lcd.setCursor(11,0);
lcd.print((char) 223); //Degree Character
lcd.setCursor(12,0);
lcd.print("C");
// Displaying the Humudity
lcd.setCursor(0,1); // First character -Second Line
lcd.print("Humid:");
lcd.setCursor(6,1);
lcd.print(nem, 2);
lcd.setCursor(12,1);
lcd.print("%");
delay(500);
}
Project Files
You can download project files by clickin the links.
- Arduino UNO Program LCD_Nem_Sicaklik.ino
- LiquidCrystal_I2C.h
- DHT11.h
Video Of Lesson


